This page gives instructions
on installing and setting-up SpamPal for use with the e-mail client
program,
TheBat
|
|
1. Install
SpamPal
2. Configure
SpamPal
3. Configure
your email program
3.1 Change your POP3 settings
3.2 Change your IMAP4 Settings
3.3 Change your SMTP settings
3.4 Create Filter/Message rules
4. Email
Virus Scanners and Firewalls
5. Whitelist
friends and contacts
|
|
Start installation by double-clicking on the SpamPal
Setup program (spampal.exe) and follow
the on-screen instructions. Upon completion, SpamPal will run, showing
its pink umbrella icon in your system tray.
If this installation is an upgrade of SpamPal
then the existing configuration of TheBat is retained and the process
is now complete. If not, i.e. this is a new installation of SpamPal,
proceed with the steps below.
|
::Top:: |
| All
you need to know about extra configuration can be found here |
::Top:: |
Now
you have set up SpamPal, you need to tell your email program to fetch
your mail through the SpamPal proxy rather than directly from your
ISP.
You need to how you collect mail from your ISP, for example, if you
use POP3 to collect your mail then your only need to change your POP3
settings. |
::Top:: |
|
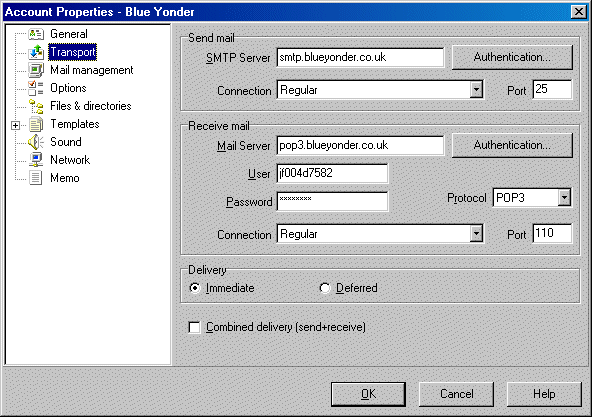
Load The Bat, then select Properties
from the Account menu. Click on the
Transport option in the list to the left, and you should see
something like this: (Screen before
changes)
|
|
|
| We'll
need to make changes to the Mail Server
and User fields.
Now, write down the name
of your POP3 server in the Mail
Server
field (e.g..pop3.yourisp.com) and
then replace this with 127.0.0.1
Now add an @
symbol and the POP3 server name,
that you wrote down earlier, to the User
field
(e.g.. my_login_name@pop3.yourisp.com)
|
| Screen after
changes: |
|
|
You
may, at this point, get an error message about SpamPal not being
able to listen on the standard POP3 port.This is nothing to
be worried about; just write down the port number SpamPal tells
you and continue with this guide
This message means SpamPal is using Port 1110
instead of 110.
You don't have to put it into SpamPal because SpamPal already
knows it is using port 110.
Instead, you have to tell your email program to use port 1110
instead of 110.
|
|
| Don't
worry; just add @localhost to the username and leave the server
name as is |
|
| continue
regardless; SpamPal copes with usernames that contain two @s
without difficulty. |
|
|
|
| Incoming
POP3 Server Name: pop3.yourisp.com |
Incoming
POP3 Server Name: localhost |
| Username:
name@surname |
Username:name@surname@pop3.yourisp.com |
|
|
| Incoming
POP3 Server Name: mail.yourisp.com |
Incoming
POP3 Server Name: 127.0.0.1 |
| Username:
my_login_name |
my_login_name@mail.yourisp.com |
|
(using LAN IP Address)
|
| Incoming
POP3 Server Name: 192.168.1.1 |
Incoming
POP3 Server Name: 127.0.0.1 |
| Username:
my_login_name |
Username:
my_login_name@192.168.1.1 |
|
The
above Incoming POP3
Server Name, can be called:
Incoming Mail
Server, POP3 server, POP3 Username
or Account Name depending on your email program.
There are also two ways of specifying the local
server name, which should mean exactly the same thing (but on
some system only one of them will work): localhost
or 127.0.0.1 |
|
| Click OK to save your
changes.
Now try to check your mail; if you don't get any
errors, continue to the next step. You may be asked to re-enter
your POP3 passwords; this is nothing to worry about. If you get
an error from TheBat, check that you've configured the incoming
POP3 server to localhost and,
if necessary, that the port has been set right. If you get an error
from SpamPal, check you've added the servername to the username
correctly, and that your Internet connection is active.
|
::Top:: |
|
Coming
Soon...
|
::Top:: |
| If you wish
to use SpamPal's SMTP Proxy to auto-whitelist any email addresses
that you send to, you will need to change TheBat's SMTP settings,
as follows |
| Select Properties
from the Account menu. Click on the
Transport option in the list to the left, and you should see something
like this: (Screen before changes) |
|
|
Now, take
a note of your current Send Mail SMTP Server,
for example: smtp.myisp.co.uk
Now change the current Send Mail SMTP Server,
to: 127.0.0.1
Now go to SpamPal's Connections
page: |
|
|
|
Now click on Add port
and change the Port Type to SMTP
Now, change the Server Name to
the Send Mail SMTP Server you
noted down earlier, e.g..smtp.myisp.co.uk
|
|
|
| Now, whenever
you send an email, SpamPal will automatically auto-whitelist it |
Occasionally,
a spammer might forge the email address of someone who is
in your auto-whitelist - for example, a colleague or an alternate
email address or yours. While you don't want to put this person
in your blacklist because they send you lots of genuine email,
you don't want them to end up in your auto-whitelist and bypass
SpamPal's spam-checking features.
Clicking on the Exclusions
pane will bring up a window into which you can enter the email
addresses of people who should never be added to the auto-whitelist.
Just add your colleagues here and you won't have to worry
about spammers forging their addresses to bypass SpamPal's
filtering. You can even add your entire employer's domain
- e.g. *@acme-widgets.com |
|
::Top:: |
If you are are
using an IMAP4 server, you
will not need to setup a filter/message rule on your email program,
as SpamPal moves any spam tagged messages automatically into a folder called inbox.spamtrap on
your
server.
If you are are using a POP3 server
and want your email program to automatically filter the SpamPal-marked messages
into a separate Mailbox, so that you can more easily review them, continue
as follows |
From the Account menu
select Sorting Office/Filters. Select
Incoming Mail from the list of filter
types then click New to bring up the
filter creation window,
On the Rules tab,
give your filter a sensible name then in the first Filtered Strings
box type ^X-SpamPal: SPAM, and set Location to Anywhere.
Go to the Options tab and ensure that
Regular Expressions is checked. Now, on
the Actions pane, check Delete
the message and Create a copy of message
in another folder. Click the little tree icon beside this latter
option, then click New and create a
folder called Spam Trap. Make sure this one's selected as the folder
to copy the message into. Now click Close
to dismiss the filters window.
|
::Top:: |
|
Specific instructions for using a variety of email
virus scanners with SpamPal can be found on the main
installation page
Some email virus filters want to sit between your
mail program and your mail server in just the way that SpamPal does.
There's actually no reason why they can't; you just have them up
in serial so that your virus filter fetches its mail through SpamPal
rather than directly from your mailserver, and then your email program
fetches the mail through the virus filter.
|
::Top:: |
|
In order to speed up the processing of your emails
and to prevent SpamPal from marking your friends or contact's emails
as spam, it's a good idea at this point to whitelist all your important
email addresses.
This can be done in four ways:
a) Use the pop3
automatic whitelist: this will whitelist non-spam
email's that you receive on a frequent basis
b) Use the smtp
automatic whitelist: which (if setup in 3.3)
will whitelist all email addresses that you send out
|
| If
you are using this, especially in a business, as this is recording
all outgoing addresses, some people might view this as an infringement
upon their privacy, (if you are in UK you need to tell staff
of this policy before you start collecting data) |
|
|
c) use
the Add to Whitelist
option on SpamPal's system tray: to manually
whitelist your email addresses by typing in an address (or by using
the dropdown box; to select from a list of recently received address):
|
|
|
| d)
Use the SpamPal Whitelist
Email Addresses page to manually
whitelist your email addresses: |
|
|
The
whitelist function only looks for email addresses in certain
headers of your email.
These headers are currently: From:,
Reply-To:,
Sender:, Mailing-List:
and Return-Path: |
|
|
Initially,
you will notice that using SpamPal makes fetching your email a little
slower. This is because SpamPal has to check everything against
the DNSBL lists (Public Blacklists) to see what email's are from
a spammer and which aren't.
However,
through it's Auto-Whitelist feature(s), SpamPal will quickly learn
about the people and machines that send you lots of email, and adds
them to a list of trusted senders. Because they're trusted, SpamPal
doesn't waste time any checking the DNSBL lists (Public Blacklists)
for them and so the more you use SpamPal, the quicker it will get.
There are more hints and tip on how to optimise SpamPal here
|
| This completes
the installation and setup. |
::Top:: |